

Addign few GB of RAM to your QNAP can transform it into a small home server. For instance a NUT server, which can shutdown your devices in case of power outage. Read more and see how to make that happen.
Nice thing about UPS devices is that they can be connected to a computer via USB cable and in case of power outage, UPS can signal that machine to shut itself down after certain perod of time, if the power grid does not recover. Moreover there is a tool called NUT (Network UPS Tools) which can play the server/client role, so that the server propagates this information to other devices powered by the same UPS, to shut themselves down as well. This is what this post is about.
There are few minor specifics to running QNAP as a NUT server, compared to the usual way of installing it on a server, so I will outline those details here and hopefully save someone or my future self a bit of troubleshooting time.
High Level Overview
At the moment I am running couple of services inside my QNAP NAS server at home. Some of them being Home Assistant VM, natively installed QNAP apps such as Plex, qBittorent, Radarr, Sonarr etc. Also there are few docker containers running. I realized that in case of power loss, I might not only loose the data, but I might as well have to go again thorugh the trouble of setting up those services. This is something I would rather avoid doing, if possible.
This diagram depicts the setup and below is an explaination:
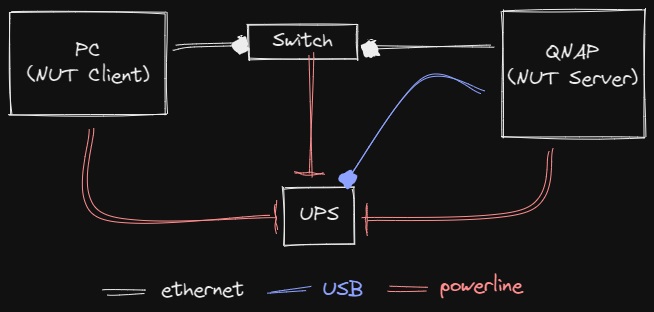
My QNAP NAS is connected with the UPS via a USB cable, and plays the role of a NUT server. When the power goes down UPS falls back to using battery. If the power does not come back after x minutes NAS will shut itself down gracefully bringing with it all the apps, VMs, and docker containers as well.
On top of that, it will signal to other devices on my network (NUT clients) that are also being powered by this same UPS and tell them they are now running on battery and they should turn off. One thing to keep in mind is this requires network connectivity between NUT server and it’s clients, even after the grid went down. For this reason, I am making sure this is the case by powering my switch via UPS as well.
Hardware should not make much of a difference, except the fact that QNAP is providing the server software adaptation with some specifics related to it. I will explain this below. To be transparent about the hardware I am using, here are some of the details. My NAS server is a QNAP 253Be with two 10TB Seagate IronWolf disks running in RAID 1 mode. My UPS is an APC Smart-UPS 750VA LCD 230V. NAS model should not matter too much, as long as it is running similar version of QTS which is QNAP’s own linux distribution. Version I am running is 4.5.4.
With that out of the way, we move on to practical things.
Setting up NUT server on QNAP
Once the USB cable is connected beetwen the UPS and NAS it should show up as an external device. Navigate to the Control Panel and then the External Device and you should see your UPS USB connection settings.
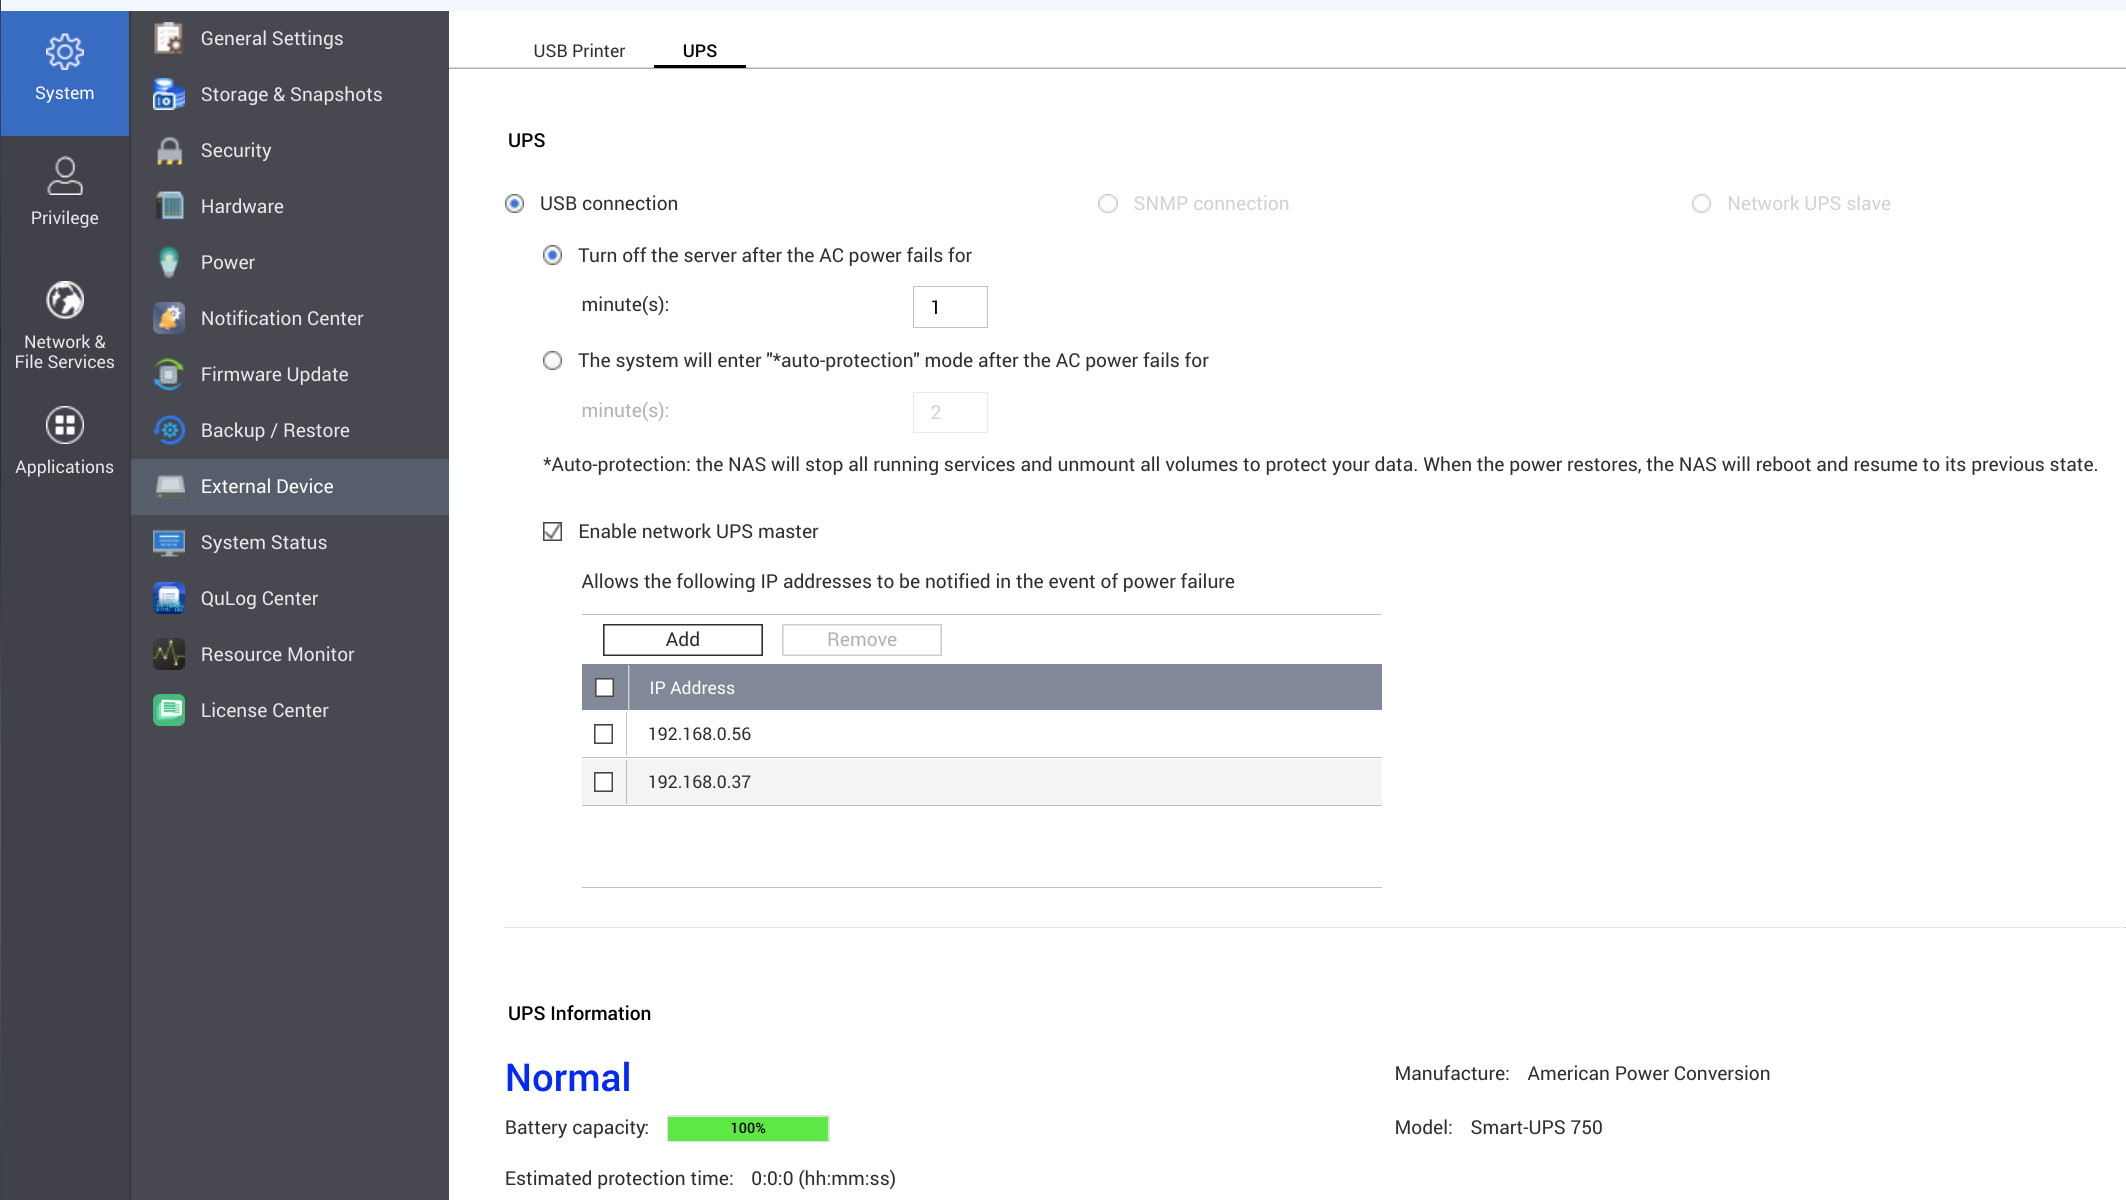
Here you will want to check the “Enable network UPS master” checkbox and enter IP addresses of the machines you are also powering with this same UPS and you want to shutdown.
Now here comes the important part. Pay attention to the next couple of paragraphs.
First of all QTS (QNAP operating system) stores NUT configuration files, unlike debian based systems, in the following location:
1
/etc/config/ups
What you would normally do on NUT server, is edit upsd.conf and add your client machines to the ACL. Don’t do that! When you tick the “Enable network UPS master” checkbox in the Control Panel screen, adding an IP address to this table actually adds that IP address automaticaly to the upsd.conf giving it a generic name like client_1. client_2 etc. for each IP address in this table. If by some chance you edit this file manually, be aware that your changes will be lost after system reboot. So, add your clients’ IP addresses through Control Panel UI.
What you actually want to do is add accounts for NUT clients to connect to this server. In case you don’t care a lot you can use one account for all your nut clients to authenticate to your server. Defining such account in upsd.users can be as simple as this:
1
2
3
4
[nutclient]
    password = my_ups_password
    allowfrom = client_1 client_2
    upsmon slave
As you can see clients 1 and 2 can both use this account to authenticate to the server. After that is done, no further action is required on the server side.
Setting up NUT clients
We will now setup other computers powered by the same UPS. This is a fairly simple thing to do. NUT client can be installed pretty much everhywhere, be it one of many supported Linux or BSD distributions, MacOS or even Windows. For everyone of those there is a corresponding binary package which you install and configure to connect to your QNAP Nut server.
For example let’s say you are using Ubuntu, then you would install the client by running:
1
sudo apt install nut-client
This will probably create two files in /etc/nut folder. Make sure nut.conf has the following content:
1
MODE=netclient
Finally in the same location in upsmon.conf add the following line:
1
MONITOR qnapups@<your_qnap_nut_server_ip> 1 nutclient my_ups_password slave
Word of warning here, make sure you enter the correct IP address of your NUT server here, and make sure that the username and password match what you entered in the upsd.users on the server. Don’t change qnapups string! This will always be the same. You can check if the client/server connection works by running this command on the client:
1
upsc qnapups@<your_qnap_nut_server_ip> ups.status
If everything went well, it should show output similar to this
1
2
➜  ~ upsc qnapups@<your_qnap_nut_server_ip> ups.status
OL
You can ommit the ups.status at the end of the previous command for a more elaborate report.
Monitor entries are written to syslog, so you can tail for those with:
1
tail -n 2000 -f /var/log/syslog | grep --line-buffered upsmon
Conclusion
As you an see this is a pretty simple, yet powerful setup. It allows you to power as many device as your UPS can handle and shut them all down, in an automated maner in case of power grid outage, hopefully withouth any damage to your systems.
I hope you found this text useful. Let me know your thought in the comments section below.
Comments powered by Disqus.